Â

- Customer: Faurecia Interior Systems India Pvt. Ltd., Pune
- Country: India
- Industry: Automotive
- Solution: Moldex3D eDesign
- View PDF Version
Executive Summary
This case features an important automotive interior part: a center console fascia. Since it is a visible part, a high level of aesthetic quality and appeal is required. Visible defects such as sink marks, weld lines and flow marks should be controlled in less visible areas of the part and kept at a minimum. Also, part warpage should be reduced in order to keep the dimensional precision within the gap and flush tolerance to ensure a proper part assembly. However, it’s a difficult challenge to fully control the warpage and eliminate the defects merely based on the previously accumulated molding knowledge and experience. Thus, Faurecia resorted to the help of Moldex3D simulation solution to make confident decisions on part and mold design optimization. Through Moldex3D detailed analyses, they were able to look at a full spectrum of molding aspects, including the detailed analyses on filling, packing, cooling and warpage and examine possible solutions to resolve the critical product defects and manufacturing difficulties. Ultimately, Faurecia was able to achieve their goal and complete their project successfully.
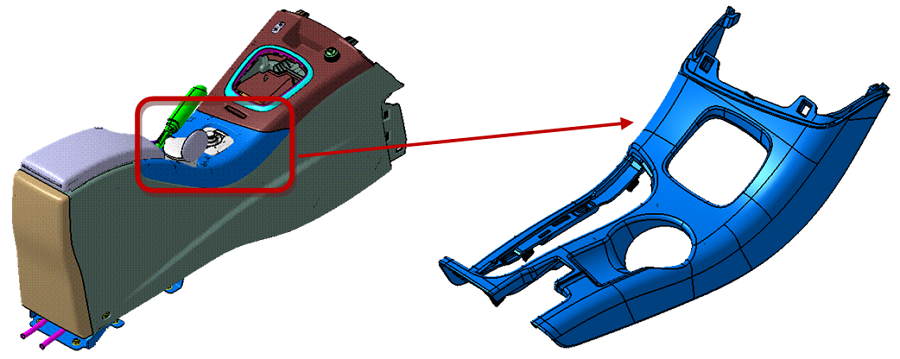
Fig. 1 Â This case features an important automotive interior part: a center console fascia.
Challenges
- Avoiding visual defects such as sink marks, weld lines, and flow marks on the visible areas of the part
- Reducing warpage within the gap and flush tolerance for part assembly
- Controlling proper temperature and pressure to avoid over-packing and short filling
Solutions
The goal of this project was to overcome the hurdles and challenges during the design and development phase instead of at the later tool launch or the mold trial stage. In this case, the whole Moldex3D eDesign analyses including filling, packing, cooling and warpage were utilized for a detailed study and design optimization.
Benefits
- Successfully avoiding weld lines in visible areas.
- Drastically reducing part deflection to keep the gap and flush well maintained within the acceptable tolerance for part assembly.
- Significantly reducing tool tuning cost by 68%.
- Successfully reducing what was traditionally a high scrap rate down to an unprecedented negligible number.
Case Study
In this case, Faurecia utilized Moldex3D eDesign full package to get in-depth insights into what might happen in the real molding with the original design. Through Moldex3D simulation results, Faurecia found out that with the original design, weld lines would occur in the visible areas of the part and warpage was severe enough to jeopardize the part precision and it might cause a failed part assembly later. Also, due to the drastic pressure and temperature drop, over-packing was observed near the gate area, and short filling was found in the thin rib region. In order to solve the abovementioned issues and produce a fine part of high aesthetic appeal, Faurecia proposed a different feeding system design along with a change in the part thickness to tackle the problems.
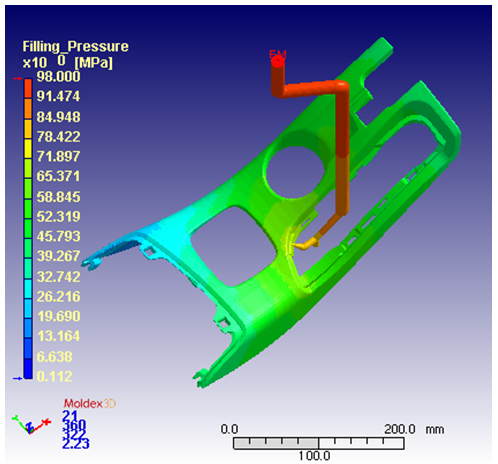 Fig. 2 Â The original feeding system design: with one hot drop and one inverse sub-gate.
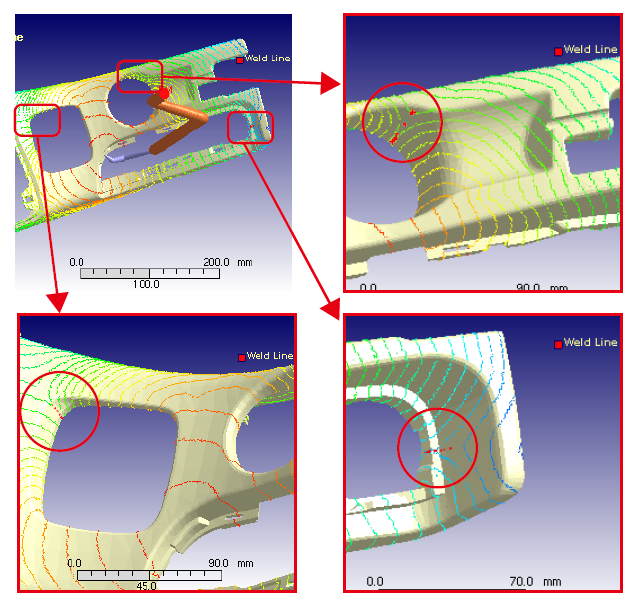 Fig. 3  According to Moldex3D’s filling analysis, the weld-lines were observed in the visible areas
of the part in the original design.
First of all, given the fact that the main goal of this project was to avoid/minimize all types visible defects like weld lines, sink marks, flow marks etc., Faurecia suggested a thickness reduction in the fillets (Figure 4) to avoid corner effects and other significant warpage in the Y & Z directions. In addition to making a change in the part thickness, Faurecia revised the feeding system design. That is, to better control the pressure and temperature drop in the cavity, Faurecia added one hot nozzle instead of injecting with only one single nozzle, then they added one more branch of cold runner with submarine gates to make the flow more uniform. Injection ribs were also added in the part for submarine gates to be placed (Figure 5). With the help of Moldex3D simulation results, the revised design proved to be very effective in improving visible defects and showed positive results.
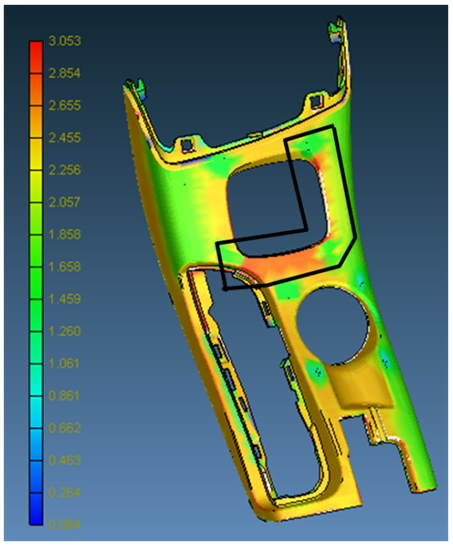 Fig. 4 Â The circled area indicated a change in the part thickness in the revised design.
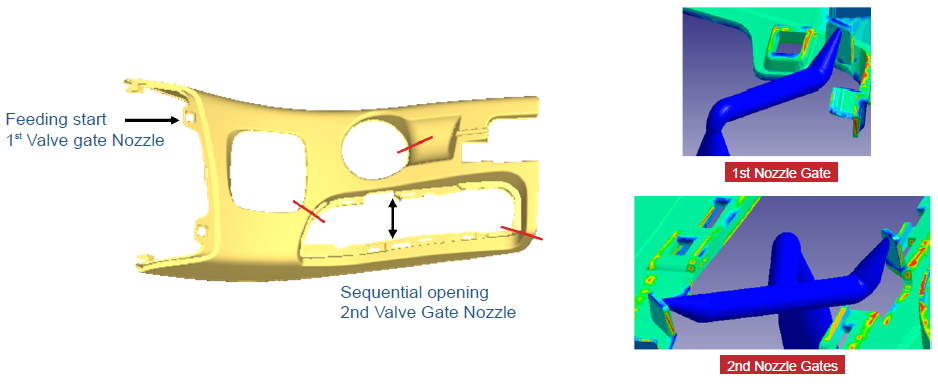 Fig. 5 Â One more hot nozzle and one more branch of cold runner were added in the revised feeding system design.
The following Moldex3D’s analysis results show a significant improvement in the weld line locations in the revised design. The weld lines were successfully moved to the corners, the less visible areas of the part (Figure 6).
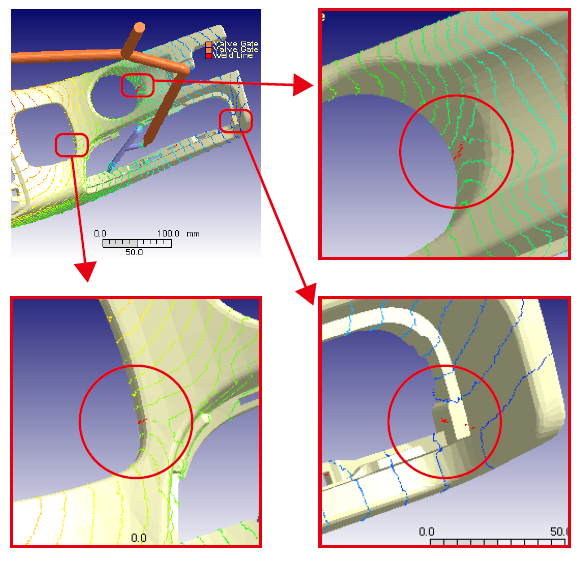 Fig. 6 Â Two weld lines were moved to the corners and one weld line (upper right) was visible, but would be covered by another part in the assembly.
Then, Faurecia conducted a correlation study between the simulation results and the actual injection trials in order to observe the accuracy of simulation and see how their suggestions were working. Moldex3D’s filling and the filling defect predications matched perfectly with the actual injection trials (Figure 7 & 8).
 Fig. 7 Â Moldex3D filling prediction matched perfectly with the actual injection trial.
 Fig. 8 Â The weld line occurred in the actual injection trial (left) and some changes in gloss on the surface in the flow hesitation area were observed (right).
According to the actual injection trial, Moldex3D’s warpage prediction was proven to be highly reliable. With the revised design, the part deflection in the Y and Z directions were drastically reduced. Thus, the warpage was greatly reduced to fit within the gap and flush tolerance to ensure a successful console assembly.
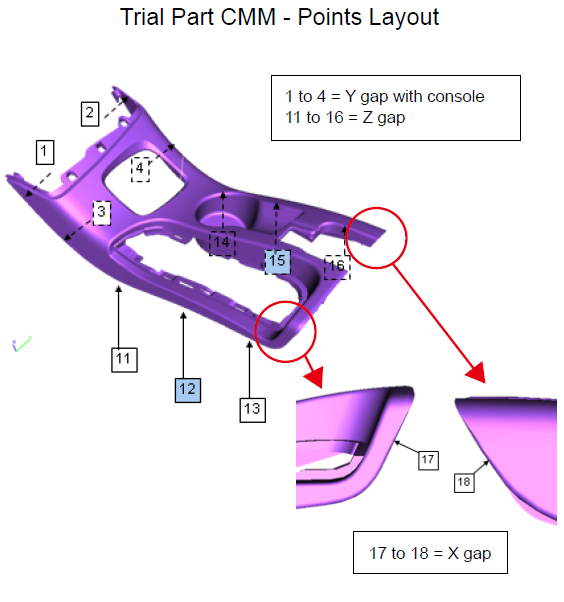 Fig. 9 Â The CMM is done on painted part with complete console assembly to check the gap and flush.
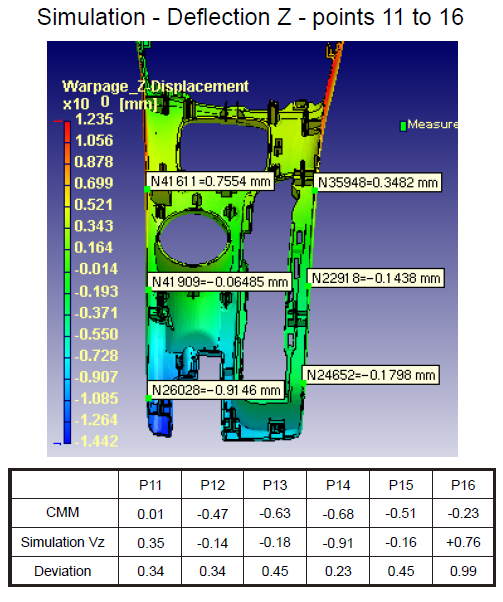 Fi. 10 Â The satisfactory warpage comparison between the simulation
and the actual CMM trial proved to be close to the reality.
Results
Through the accurate simulation results by Moldex3D, Faurecia was able make good use of the simulation data to optimize the filling and packing profiles and successfully avoid the occurrence of weld lines in the visible areas of the part. Also, the Y and Z deflections were drastically reduced, making the gap and flush well maintained for a successful console assembly.
In addition, with the involvement of Moldex3D’s simulation results into the design and development phase, the tool tuning cost, which normally contributed to at least 4% of the total tool cost, was able to significantly reduce down by 68%. Moreover, generally speaking, the scrap rate of the similar type of components was very high due to the strict aspect requirements; however, for this part the scrap rate was greatly reduced to an unprecedented negligible number. Each design change was simulated and validated by Moldex3D analysis, thus, Faurecia was able to make confident decisions in every stage of the product development and optimization phase. That is, by optimizing the part and feeding system designs, Faurecia was able to achieve these phenomenal results: prolonging the tool life, lowering part rejection and successfully completing the project.
Tapered Roller Thrust Bearings,Tapered Roller Bearings,Double Row Roller Bearings
Huatao Group Limited , https://www.rollerandreducer.com